大事なのはmergeProps、そして退かぬ心じゃ
エンジニアの原です。
最近なぜかreact-reduxの解説記事をやたら目にしますが何かあったのでしょうか?
気になるのが解説記事の中であまりmergePropsの重要性が語られていないことです。
https://redux.js.org/basics/example-todo-list
すべての元凶はこのサンプルでしょうか…?
今回はmapStateToPropsとmergePropsの役割とその重要性についてちょっと書いてみたいと思います。
reduxのサンプルに問題があるとして下記のQiitaの記事で指摘がされています。
https://qiita.com/zaki-yama/items/5258e6f1ae37f63034b9
このQiitaの記事で解決したい課題として
getVisibleTodos() は 関係する state.todos もしくは state.visibilityFilterに更新があったかどうかに関わらず state が更新されるたびに実行されるので、フィルタリング処理の計算コストが高かった場合パフォーマンスに影響が出てしまう。
とあります。
そうですね。
しかしこれはそもそもmapStateToPropsで計算をしている事自体が間違いです(公式サンプル全否定)。
と言い切るのもどうかと思いますが、パフォーマンスを考えたときにmapStateToPropsとmergePropsの処理を考えるとmapStateToPropsで計算処理をすることは間違いと言っても過言では無いと思います。
そもそもmapStateToPropsとmergePropsという名前が全然役割を表して無くてこれが良くないと思ってます。
react-reduxの仕事
react-reduxのmapStateToPropsはこの名前から、「ReduxStateから取り出した値をComponentに渡したい形に変更する」と思われがち(っていうかreduxのサンプルがあれですからね)ですが、
本来の仕事は変更を監視したいReduxStateの選別です。
react-reduxの仕事として
- ReduxStoreの必要な要素の変更の監視
- 最適なレンダリング
があります。
react-reduxはReduxStoreの値を監視していていどれかに変更があると処理を行います。
なので、「ReduxStateに変更があったとき」が始まりで「コンポーネントをレンダリングするか否か(renderを実行するか)」が結果になります。
処理は以下の流れです(わかりやすくするためにOwnPropsは変更されない, connectのoptionは未定義(デフォルト)と仮定します)。
- ReudxStateの参照が同じか(===比較)?
- true: 再レンダリングしない。処理終了。
- false: 2へ
- mapStateToPropsを計算。
- 前回のmapStateToPropsと結果同じか(shallow比較)?
- true: 再レンダリングしない。処理終了。
- false: 4へ
- megePropsを計算
- 前回のmergePropsと結果が同じか(mergeProps未定義? ===比較 : shallow比較)?
mergePropsは定義してなくても、mapStateToPropsを定義しているとデフォルトの
{...mapStateToPropsResult, ...mapDispatchToPropsResulg, ...ownProps}
が実行されます。
mergePropsは未定義の場合、前回の結果と===で比較が行われるため必ずfalseになります。
mergePropsではmapStateToPropsを元に計算したりだとか、Componentに渡したくない(表示に関係ない)けどクリックイベントなどによってAPIを叩いたりするときに必要なActionを定義したりすると良いです。
たとえばReduxStateの値からあらたに値を生成する時に、Stateの値は変わってるけど計算結果が変わらない場合、mergePropsで適切に処理をすると無駄なレンダリングをしなくて済みます。
const mapStatToProps = (state) => ({
  scoreA: state.scoreA,
  scoreB: state.scoreB,
});

const mergeProps = (mapStatToProps) => ({
  score: mapStatToProps.scoreA + mapStateToProps.scoreB
})


/* もともと scoreA = 10, scoreB = 2でscoreA = 8, scoreB = 4になったとしても、
前回のmergePropsの比較で同じと判定されるのでレンダリングが行われない
/*
では、Qiitaで述べられている解決したい課題をreselectを使わずに解決します。
import { connect } from 'react-redux'
import { toggleTodo } from '../actions'
import TodoList from '../components/TodoList'

const getVisibleTodos = (todos, filter) => {
  switch (filter) {
    case 'SHOW_COMPLETED':
      return todos.filter(t => t.completed)
    case 'SHOW_ACTIVE':
      return todos.filter(t => !t.completed)
    case 'SHOW_ALL':
    default:
      return todos
  }
}

const mapStateToProps = ({ todos, visibilityFilter }) => ({
  todos,
  visibilityFilter
})

const mapDispatchToProps = dispatch => ({
  toggleTodo: id => dispatch(toggleTodo(id))
})

const mergeProps = ({ todos, visibilityFilter}, mapDispatchToProps) => ({
  todos: getVisibleTodos(todos, visibilityFilter)
})

export default connect(
  mapStateToProps,
  mapDispatchToProps,
  mergeProps
)(TodoList)
解決したい問題の
state.todos もしくは state.visibilityFilter に更新があったかどうかに関わらず state が更新されるたびに実行されるの
ですが、上記の処理に当てはめると
仮にtodos, visibilityFilterに関係ないReduxStateが変更された場合
- ReudxStateの参照が同じか(===比較)?
falseなので2へ
- mapStateToPropsを計算。
todos, visibilityFilterを参照するのみです。
- 前回のmapStateToPropsと結果が同じか(shallow比較)?
trueでレンダリングも行われず処理は終了します。
となり、無駄にgetVisibleTodosが実行されるのを防げます。
入門系の記事だとmeregePropsの内容が疎かだったりするのですが、パフォーマンスを考える際にはmergePropsの理解は必須です。
react-reudxはコード量もそんなに多くないので読んでみる事をお薦めします。
react-reduxのパフォーマンスについて
エンジニアの原です。
これ、数人同じ事思ってる人いたみたいでした。よかった。
http://anect.hatenablog.com/entry/2017/06/09/151000:embed:cit
ブログ内では「mapStateToPropsとmapDispatchToPropsを使う理由が分からない、mergePropsで全部やるのがシンプルで良いじゃないか」というものでしたが
今回react-reduxのソースを解説しつつそれらの役割と必要性についてと実際どうするべきか、について少し考えました。
TL;DR
結論から言うと
「場合によって(というか多くの場合)はmapStateToPropsとmapDispatchToPropsをちゃんと使わないとパフォーマンスが下がる」
です。
以下、ソースの解説と自分の意見です。
react-reduxの実装の話
ちょっとだけreact-reduxの実装の話をします。
以下の説明はconnectにオプション(第4引数)未定義の場合に限ります。
connectのソースは以下になります。
https://github.com/reactjs/react-redux/blob/master/src/connect/connect.js
connectはHightOrderComponentを作成する関数を返します。以下はconnect.jsの一部です。
export function createConnect({
  connectHOC = connectAdvanced,
  mapStateToPropsFactories = defaultMapStateToPropsFactories,
  mapDispatchToPropsFactories = defaultMapDispatchToPropsFactories,
  mergePropsFactories = defaultMergePropsFactories,
  selectorFactory = defaultSelectorFactory
} = {}) {
  return function connect(
    mapStateToProps,
    mapDispatchToProps,
    mergeProps,
    {
      pure = true,
      areStatesEqual = strictEqual,
      areOwnPropsEqual = shallowEqual,
      areStatePropsEqual = shallowEqual,
      areMergedPropsEqual = shallowEqual,
      ...extraOptions
    } = {}
  ) {
    const initMapStateToProps = match(mapStateToProps, mapStateToPropsFactories, 'mapStateToProps')
    const initMapDispatchToProps = match(mapDispatchToProps, mapDispatchToPropsFactories, 'mapDispatchToProps')
    const initMergeProps = match(mergeProps, mergePropsFactories, 'mergeProps')

    return connectHOC(selectorFactory, {
      // used in error messages
      methodName: 'connect',

       // used to compute Connect's displayName from the wrapped component's displayName.
      getDisplayName: name => `Connect(${name})`,

      // if mapStateToProps is falsy, the Connect component doesn't subscribe to store state changes
      shouldHandleStateChanges: Boolean(mapStateToProps),

      // passed through to selectorFactory
      initMapStateToProps,
      initMapDispatchToProps,
      initMergeProps,
      pure,
      areStatesEqual,
      areOwnPropsEqual,
      areStatePropsEqual,
      areMergedPropsEqual,

      // any extra options args can override defaults of connect or connectAdvanced
      ...extraOptions
    })
  }
}
export default createConnect()
通常、
connect(mapStateToProps, mapDispatchToProps, mergeProps)(MyComponent)
このように使う時はconnectHOCというHighOrderComponentが返ります。
connectHOCの実体はconnectAdvanceです。
https://github.com/reactjs/react-redux/blob/master/src/components/connectAdvanced.js
このComponentはReduxStateとComponentのPropsの変更を監視して、必要があればrenderを実行するというものです。
ReactではComponentのrenderを制御するshouldComponentUpdateというメソッドがあります。
connectAdvanceでの実装は
shouldComponentUpdate() {
    return this.selector.shouldComponentUpdate
}
となっています。selectorの実体は
const selector = {
    run: function runComponentSelector(props) {
      try {
        const nextProps = sourceSelector(store.getState(), props)
        if (nextProps !== selector.props || selector.error) {
          selector.shouldComponentUpdate = true
          selector.props = nextProps
          selector.error = null
        }
      } catch (error) {
        selector.shouldComponentUpdate = true
        selector.error = error
      }
    }
  }
このsourceSelectorというのがReduxStoreの変更、ComponentのPropsの変更、mapStateToPropsの変更、mergePropsの変更をチェックして変更が合った場合はあたらしいオブジェクトを返すという動作をします。
そして、この変更をチェックする関数がconnectHOCの引数の
      areStatesEqual,
      areOwnPropsEqual,
      areStatePropsEqual,
      areMergedPropsEqual,
です。connectのオプション(第4引数)で実装を指定できますが、デフォルトは
      areStatesEqual = strictEqual,
      areOwnPropsEqual = shallowEqual,
      areStatePropsEqual = shallowEqual,
      areMergedPropsEqual = shallowEqual,
です。
strictEqualはただの===での比較で、shallowEqualは以下の実装になっています。
https://github.com/reactjs/react-redux/blob/master/src/utils/shallowEqual.js
sourceSelectorの実体はselectorFactory.jsのpureFinalPropsSelectorFactoryになります。(デフォルトpure=trueなので)
https://github.com/reactjs/react-redux/blob/master/src/connect/selectorFactory.js
このコード中で使われているmergePropsはconnectに渡したmergePropsではなくinitMergePropsの返り値で有ることに注意して下さい。
ここでのinitMergePropsの実体はmergeProps.jsのwrapMergePropsFuncの返り値です。
https://github.com/reactjs/react-redux/blob/master/src/connect/mergeProps.js
この中で前回のmergePropsの結果と今回の結果をareMergePropsEqualで比較して違えば新しい結果を、同じであれば前回の結果を返す、という動作をしています。
なので、mergePropsの結果が変わらなければconnectAdvanceのrenderは実行されないということがわかります。
パフォーマンスが悪くならないケース
ここで言う「パフォーマンスが悪くならない」とはconnectが必要以上にレンダリングされないことを指します。
下記の例ではパフォーマンスにさほど問題は起きないでしょう。
const mergeProps = (state, { dispatch }, own) => ({ name: state.user.name });
connect(state => state, dispatch => ({ dispatch }), mergeProps);
stateのどれか1つでも変化するとmapStateToPropsの比較がfalseになるのでmergePropsの結果の比較が行われます。
もし上記の例のようにmergePropsにAction等の関数がない場合、nameの値が変わらなければ、mergePropsの比較がtrueになるのでレンダリングは行われません。
パフォーマンスが悪くなるケース
下記の例ではなにか1つでもReduxStateの値が変わるとレンダリングが行われます。
const mergeProps = (state, { dispatch }, own) => ({
    name: state.user.name,
    onSubmit: () => {
       const token = state.user.token;
       const name = state.edit.name;
       fetch(...);
    },
});
connect(state => state, dispatch => ({ dispatch }), mergeProps);
上記でonSubmitに無名関数を渡しています。この無名関数はmergePropsが実行されるたびに生成されるので、mergePropsの比較は必ずfalseになります。
ということは
ドキュメントに従ってreact-reudxにレンダリングのパフォーマンスまで任せる(子の最適化はしない)というのであればmapStateToPropsとmapDispatchToPropsをちゃんと定義するのが良いでしょう。
ただ個人的にはmergePropsにまとめて、各Componentがレンダリングの最適化を行うのが良いかなと思ってます。
Presentational Componentの責務を考える
一番の理由は、描画に関係ないロジックがComponentに漏れるのは避けたいからです。(例えば、上記のonSubmitがonSubmit(token, name)となるような)
これは私が基本的にPresentational ComponentとContainerd Componentに分けて設計を行うことが多く、Presentatioanl ComponentはほぼStateless Functional Component(SFC)で作ることが多い事に関係します。
例えば上記の例だと、ReduxStateにUserの基本情報(tokenとか)、変更内容内容(変更されたnameとか)があるので、onSubmitが押されたらReduxStateからtokenとnameを取ってきてfetchを実行すれば良いのでonSubmitが引数を必要としません。
// 描画とイベントの取得のみに務める
export default ({ name, onSubmit}) => (
  <>
      <div>{name}</div>
      <button onClick={onSubmit}>Submit</button>
  </>
);
こうすることでonSubmitはボタンが押された事だけを通知するというシンプルな役割になります。
逆にonSubmit(token, name)としてしまうと、onSubmitの内部処理にtokenとnameが必要であるというロジックがComponentが知っておく必要があります。Presentational Componentとして振る舞うのであれば、表示とイベントの取得のみを果たすべきであり、イベントが起きた後のロジックに関する事(tokenが必要だよ、とか)はさせるべきではないと考えてます。
// tokenは描画しないけどonSubmitに必要
export default ({ name, token, onSubmit}) => (
  <>
      <div>{name}</div>
      <button onClick={() => onSubmit(token, name)}>Submit</button>
  </>
);
また、tokenのような描画に一切関係ない情報をPropsとしてComponentに提供しなければならないという点もPresentationa Componentとして良くないと思います。
仮にonSubmitで送る必要があるデータが増えた場合、このComponentの見え方には影響が無くても変更しなければなりません。これは明らかにロジックがViewに漏れています。
私の結論
とか色々考えた結果、react-reduxにはReduxStoreの監視とデータのフィルタリングだけをお願いしてレンダリングのパフォーマンス部分に関しては個々のコンポーネントが担う方が良いのではないかという結論に至ってます(今現在)。
なので、react-reduxの部分は
const mapStateToProps = state => state;
const mapDispatchToProps = dispatch => ({ dispatch });
const mergeProps = (state, {dispatch}, own) => ({
    name: state.user.name,
    onSubmit: await () => {
      const token = state.user.token;
      const name = state.edit.name;
      const response = await fetch(...);
    }
});
const option = { areStatePropsEqual: () => false }; // shallowEqualを使ってもstate全渡しなので必ずfalseになるため無条件でfalseに
connect(mapStateToProps, mapDispatchToProps, mergeProps, option)(MyComponent);
みたいな感じでどうかなーと考えています。
あとはMyComponentのchildrenの各々がReact.PureComponentなりrecompose.pureなりで最適化していれば、レンダリングのコストは抑えられると思います。
KotlinJS x ReactNativeにトライしてみた
前回でKotlinJSの使い方がチョットだけわかったので、ReactNativeで動くようにしてみたいと思います。
プロジェクト作成。
Intellij ideaで進めていきます。
KotlinJSプロジェクトを作ります。
次のそのプロジェクトのrootでReactNativeのプロジェクトを作ります。
react-native init rn
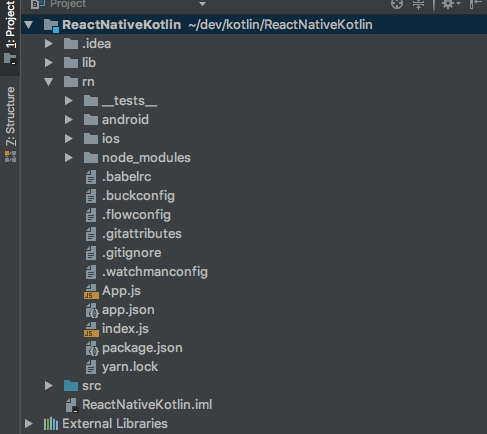
とりあえず図のような構成にします。
コンパイル結果のディレクトリを調整する
Project Structure -> Project Settings -> Projectを開きます。
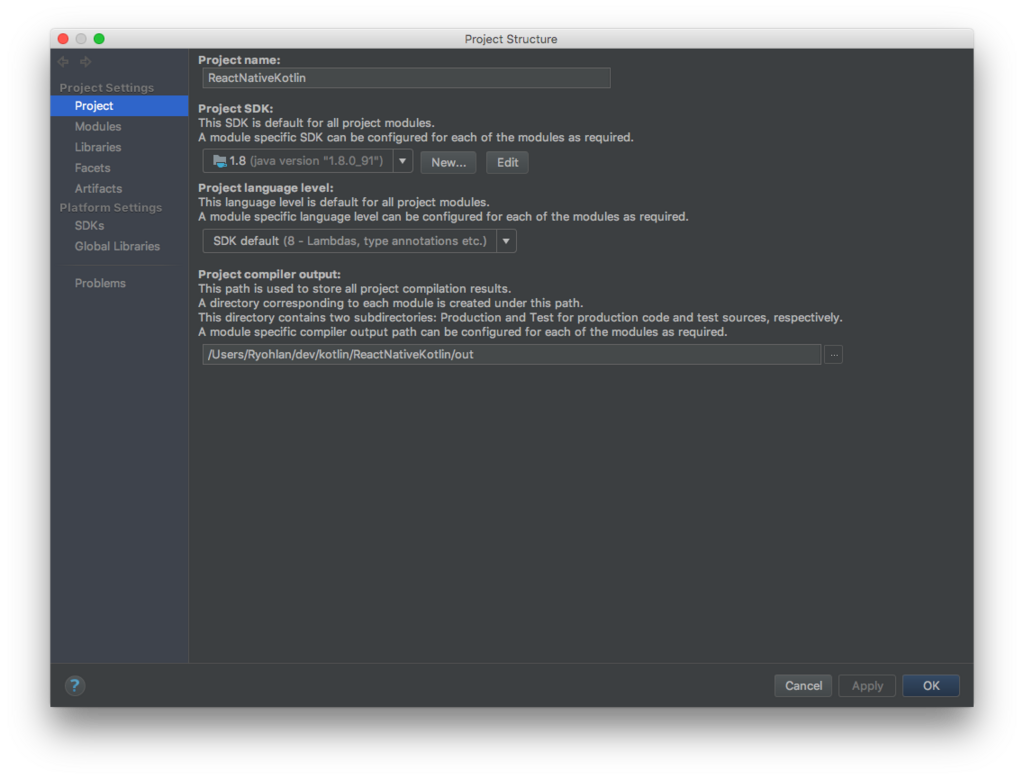
Project compiler outputをReactNativeプロジェクトのnode_modulesにします
変更後
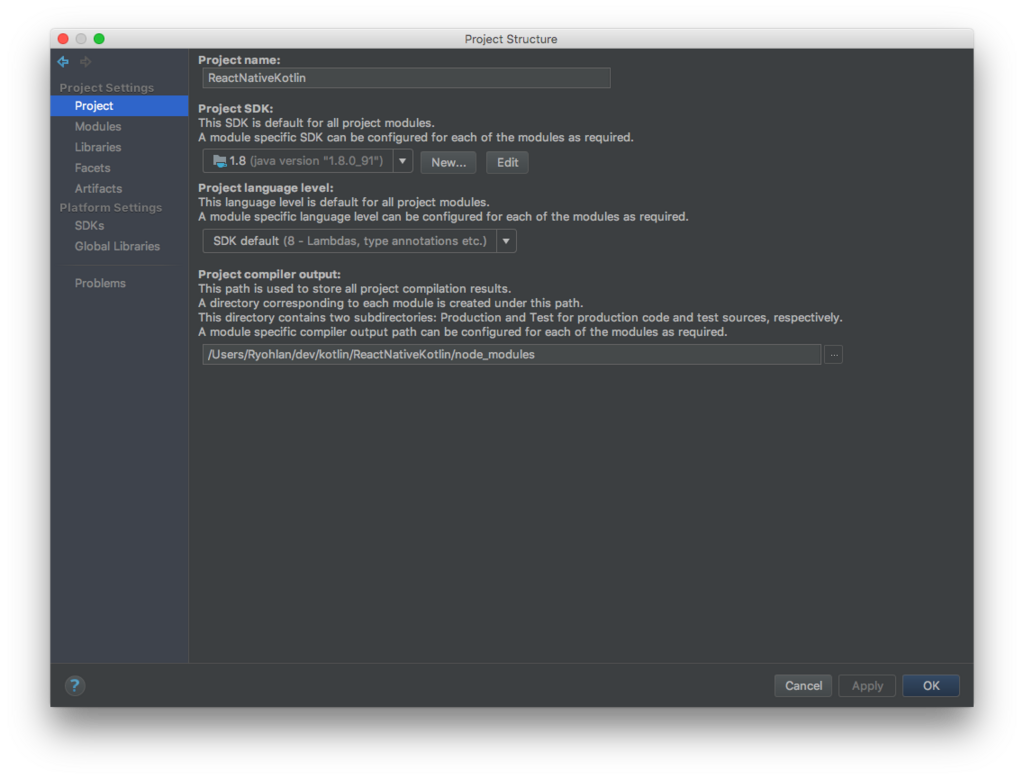
次にProject Structure -> Project Settings -> Modulesを開きます。
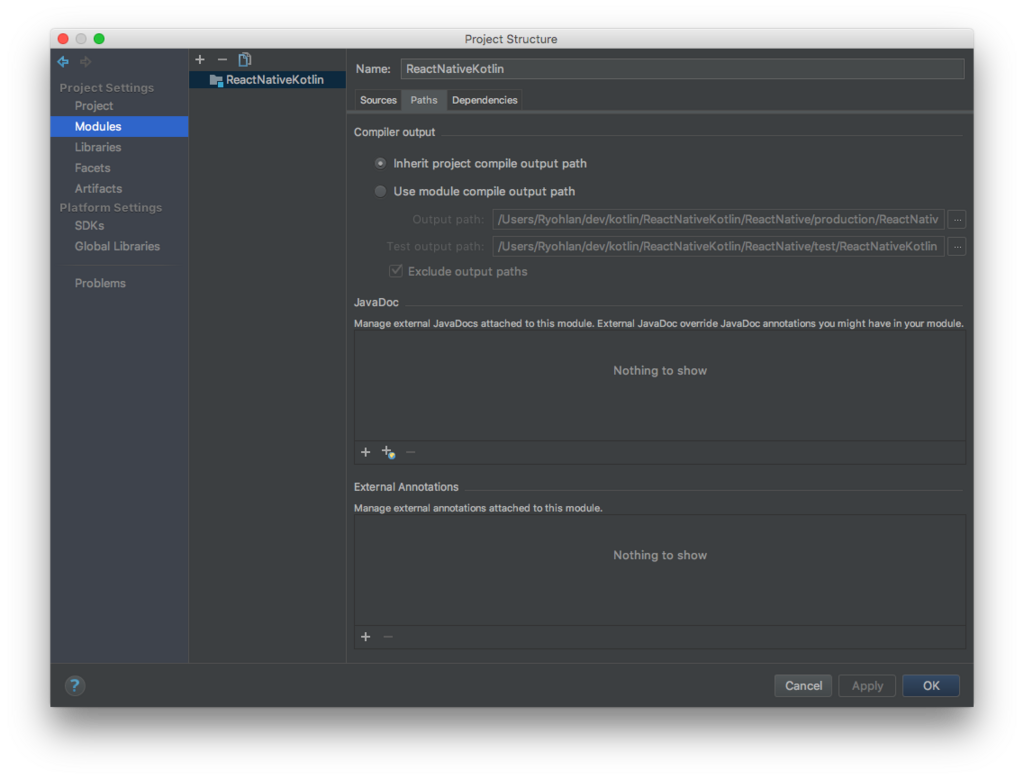
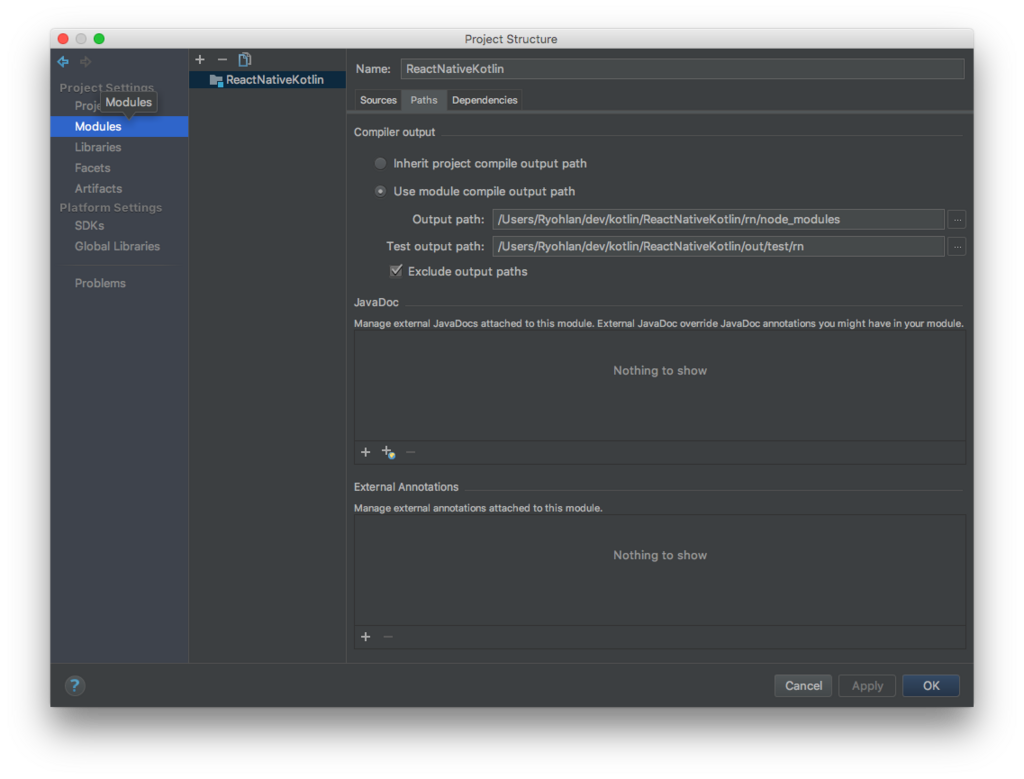
図のCompiler outputを作成したReactNativeプロジェクトのnode_modulesに変更します。
変更後
次に、Preferences -> Build, Execution ... -> Compiler -> Kotlin Compilerを開きます。
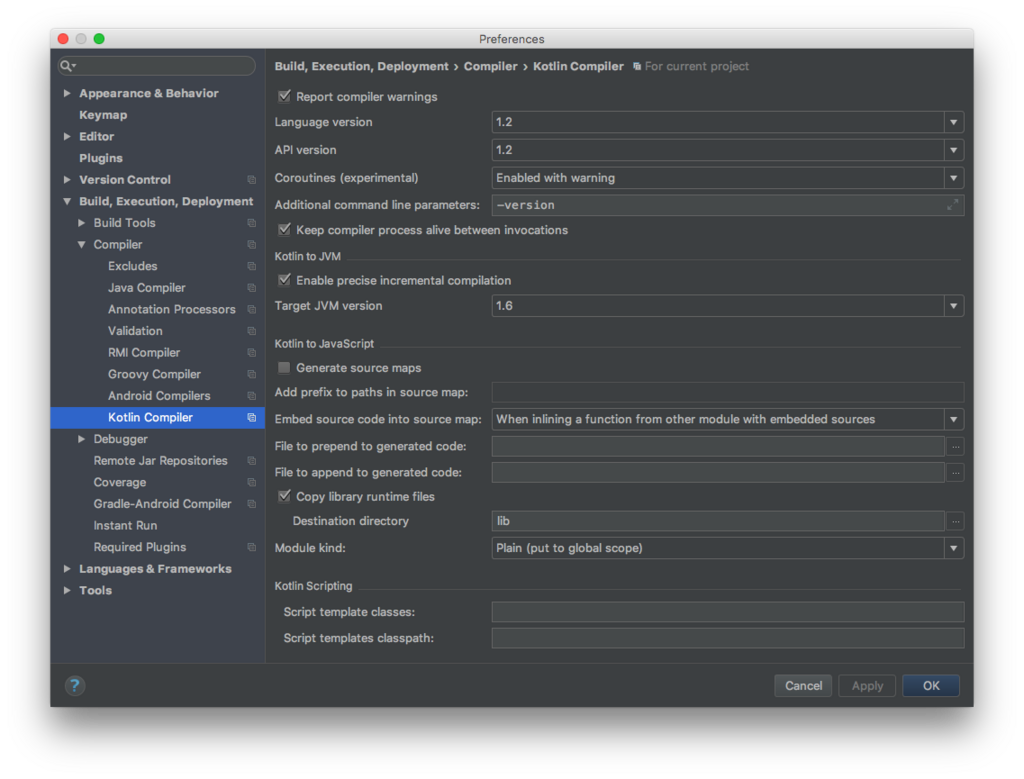
前回もありましたが、Destination directoryとModule kindを以下のように変更します。
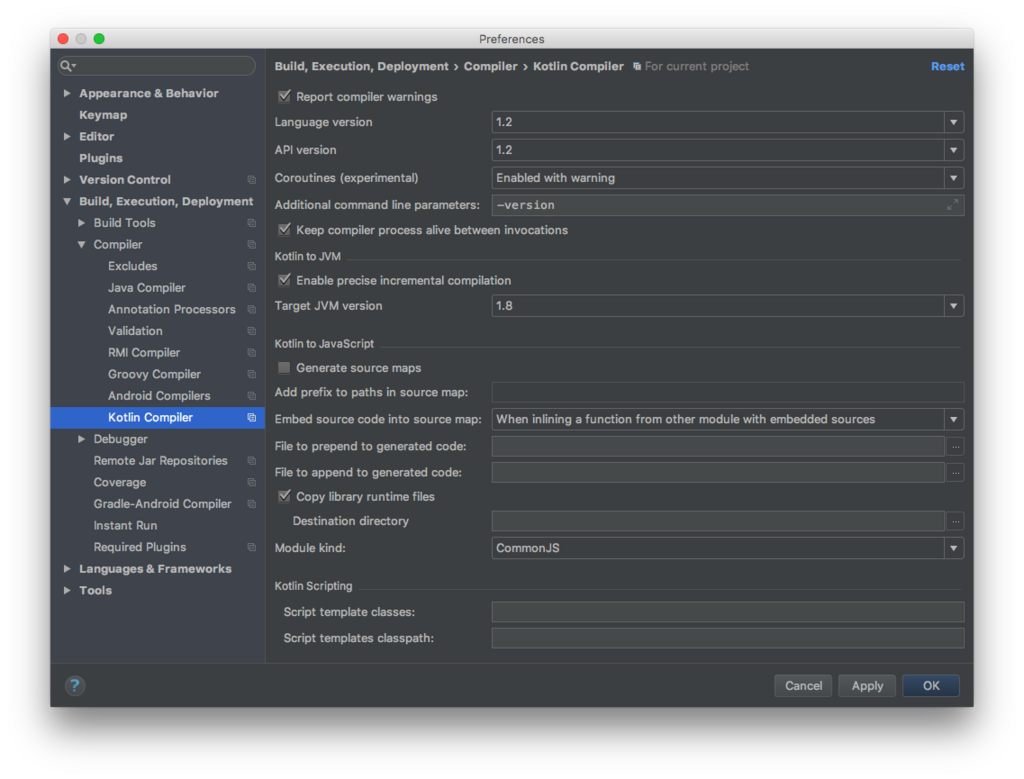
これでプロジェクトの設定は完了です。
ReactNativeでHelloWorld
では、ハロワしましょう。
index.jsはReact Nativeが直接参照しているので変更してはいけません。
とりあえずはrnディレクトリにあるApp.jsを変更して今回目標とするハロワのコードを書いてみましょう。
App.js
import React from 'react';
import {
  Text,
  View,
} from 'react-native';

module.exports = () =>
    <View style={{flex: 1, alignItems: 'center', justifyContent: 'center'}}>
        <Text>Hello World</Text>
    </View>;
これをiPhoneSimulatorで確認します。
react-native run-ios
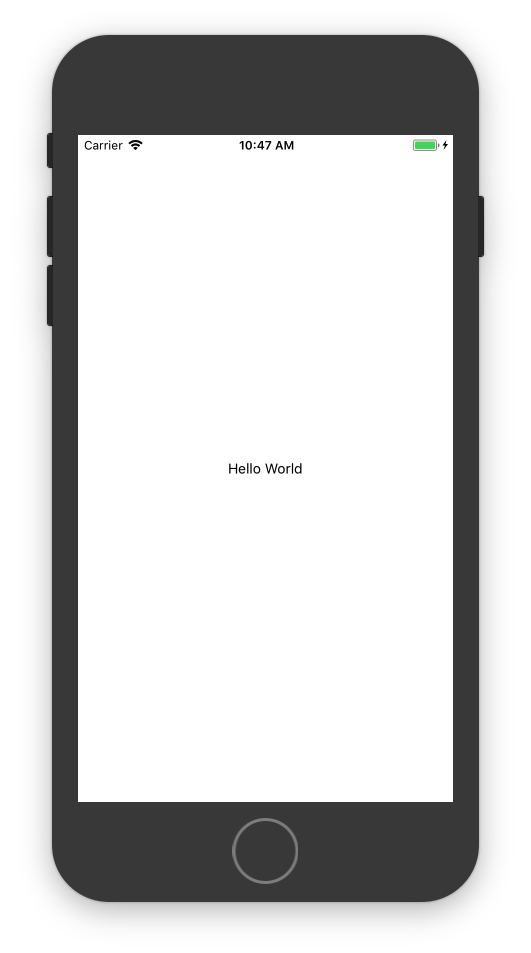
目標はこんな感じです。
App.ktを作成
src以下にApp.ktファイルを作成します
コンパイルが通る程度に適当にApp.jsっぽい感じに書いてみましょう
import kotlin.js.json

@JsModule("react")
external object React {
    class Component
    fun createElement(element:Component, props: dynamic, children: dynamic)
}

@JsModule("react-native")
external object ReactNative {
    val View: React.Component
    val Text: React.Component
}

fun App():dynamic = React.createElement(
        ReactNative.View,
        json(Pair("style", json(
                Pair("flex", 1),
                Pair("alignItems", "center"),
                Pair("justifyContent", "center")
        ))),
        React.createElement(ReactNative.Text, null, "Hello World"));
JSXでは書けないのでReact.createElementで書きます。
json
これはKotlinJSの機能でJavaScriptのJSONに変換できる機能です。
json - Kotlin Programming Language
以下がコンパイル結果です
(function (_, Kotlin, $module$react, $module$react_native) {
  'use strict';
  var Pair = Kotlin.kotlin.Pair;
  var json = Kotlin.kotlin.js.json_pyyo18$;
  function App() {
    return $module$react.createElement($module$react_native.View, json([new Pair('style', json([new Pair('flex', 1), new Pair('alignItems', 'center'), new Pair('justifyContent', 'center')]))]), $module$react.createElement($module$react_native.Text, null, 'Hello World'));
  }
  _.App = App;
  Kotlin.defineModule('ReactNativeKotlin', _);
  return _;
}(module.exports, require('kotlin'), require('react'), require('react-native')));
コンパイル結果みるとイケそうな感じ
index.jsを少し変更します。
import { AppRegistry } from 'react-native';
import { App } from 'ReactNativeKotlin';

AppRegistry.registerComponent('rn', () => App);
実行

...
...
...
(あれ、読み込みが遅い…)
...
...

駄目だったか…
原因を探す
とりあえずbundleだけしてみましょう。
% react-native bundle --entry-file index.js --bundle-output ./ --dev false --platform ios
Scanning folders for symlinks in /Users/Ryohlan/dev/kotlin/ReactNativeKotlin/rn/node_modules (15ms)
Scanning folders for symlinks in /Users/Ryohlan/dev/kotlin/ReactNativeKotlin/rn/node_modules (14ms)
Loading dependency graph, done.
...
...
bundleも終わらない。
kotlin.jsがbundle出来ない
コンパイル結果を色々いじって見た結果、kotlin.jsをrequireするとbundleが上手く行きません。
ログにタイムアウトが出てたのでmetro-bundlerのタイムアウト時間を伸ばしてみたけど駄目でした。
とりあえず、kotlin.jsからコンパイル結果で使っているものを抜粋して動かしてみます。
function Pair(first, second) {
  this.first = first;
  this.second = second;
}
Pair.prototype.toString = function () {
  return '(' + this.first + ', ' + this.second + ')';
};
Pair.prototype.component1 = function () {
  return this.first;
};
Pair.prototype.component2 = function () {
  return this.second;
};

function json(pairs) {
  var tmp$;
  var res = {};
  for (tmp$ = 0; tmp$ !== pairs.length; ++tmp$) {
    var tmp$_0 = pairs[tmp$];
    var name = tmp$_0.component1(), value = tmp$_0.component2();
    res[name] = value;
  }
  return res;
}

var Kotlin = {
  defineModule: function(a, b) {},
  kotlin: {
    Pair: Pair,
    js: {
      json_pyyo18$: json,
    }
  }
};

(function (_, Kotlin, $module$react, $module$react_native) {
  'use strict';
  var Pair = Kotlin.kotlin.Pair;
  var json = Kotlin.kotlin.js.json_pyyo18$;
  function App() {
    return $module$react.createElement($module$react_native.View, json([new Pair('style', json([new Pair('flex', 1), new Pair('alignItems', 'center'), new Pair('justifyContent', 'center')]))]), $module$react.createElement($module$react_native.Text, null, 'Hello World'));
  }
  _.App = App;
  Kotlin.defineModule('ReactNativeKotlin', _);
  return _;
}(module.exports, Kotlin, require('react'), require('react-native')));
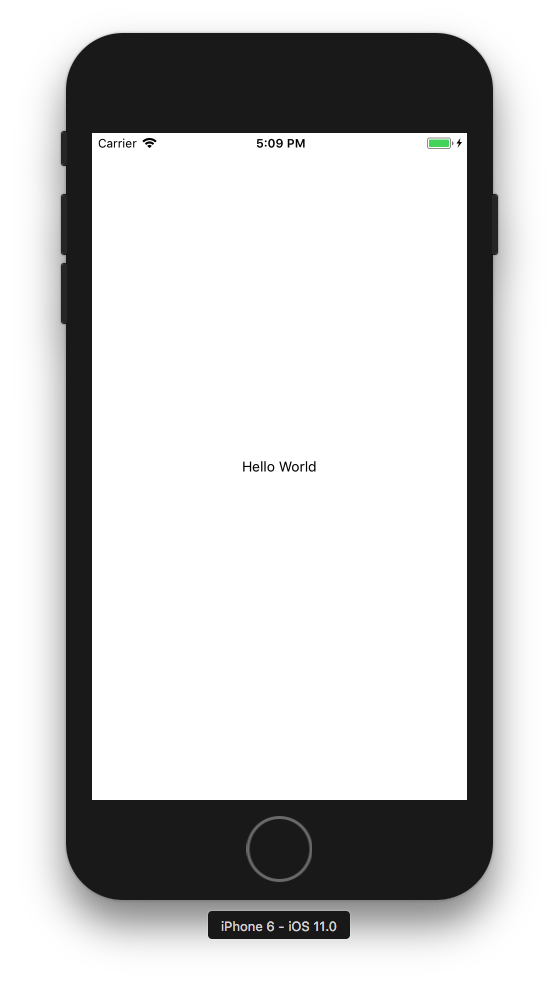
ちゃんと表示されました。
やはりkotlin.jsの何かが問題なようです。(37000行あるので全部見れてません…)
うーむ、いいところまで行った気がしたんですがね。
まとめ
現状だと普通に動かすのは無理のようです。
kotlin.jsはKotlinの機能をjsに置き換える処理が書かれているので無くすことは出来ないので、修正されるかReactNative用の何かが出るまで待つしかないですかね。
まぁReactNativeでKotlinJS使いたいって要望無さそうですが…
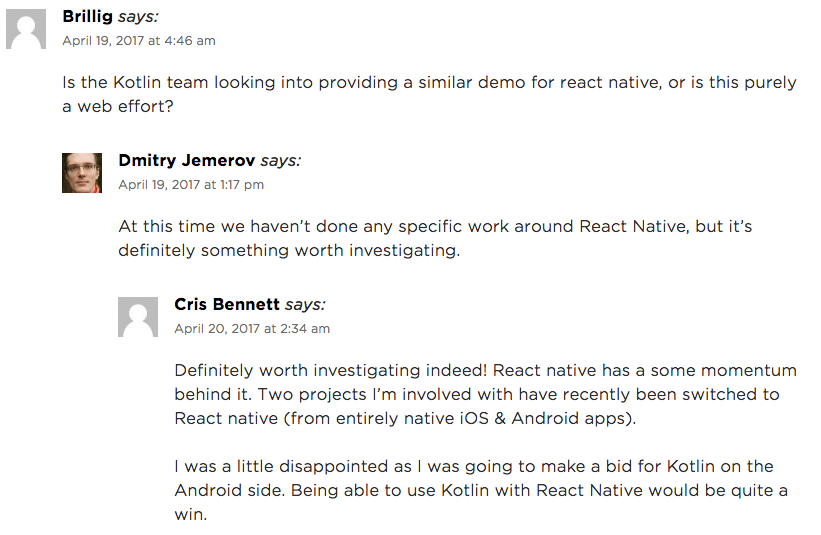
と思ったらいるっぽい。
Use Kotlin with npm, webpack and react | Kotlin Blog
KotlinJSを動かす
エンジニアの原です。
先日Kotlin1.2がリリースされました。
バックエンド、Webフロントエンド、Androidでコードの共通化ができるようになったとこのことです。
今回はその機能は触らないんですが、前にリリースされたKotlinJSとKotlinNativeには興味がありました。
で最近はずっとReactNative, ReactSPAばっかりやってて、ふと思いました。
React NativeのAndroidのコードはKotlin化は余裕
KotlinJSでKotlinでJSが吐き出せる
KotlinNativeでiOSが動かせる
「これはReactNativeはKotlinだけで動かせるのでは?」
ということで、色々試してみます。
KotlinJSを動かす
まずここからです。先は長い。
とりあえずハロワ
プロジェクト作成
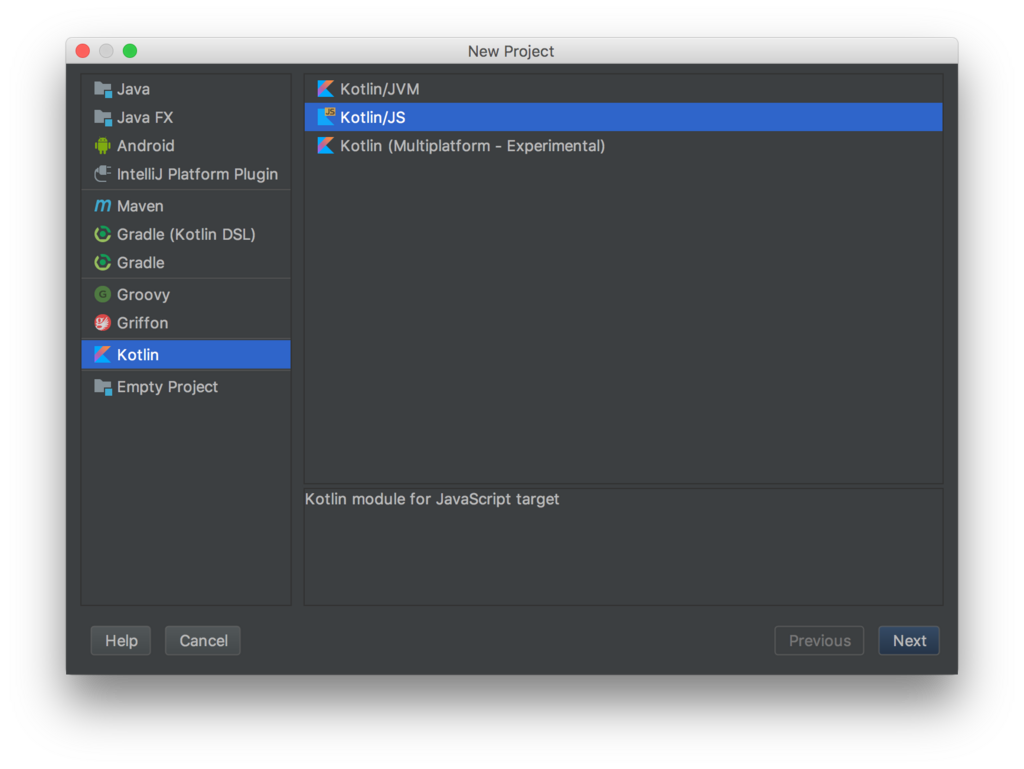
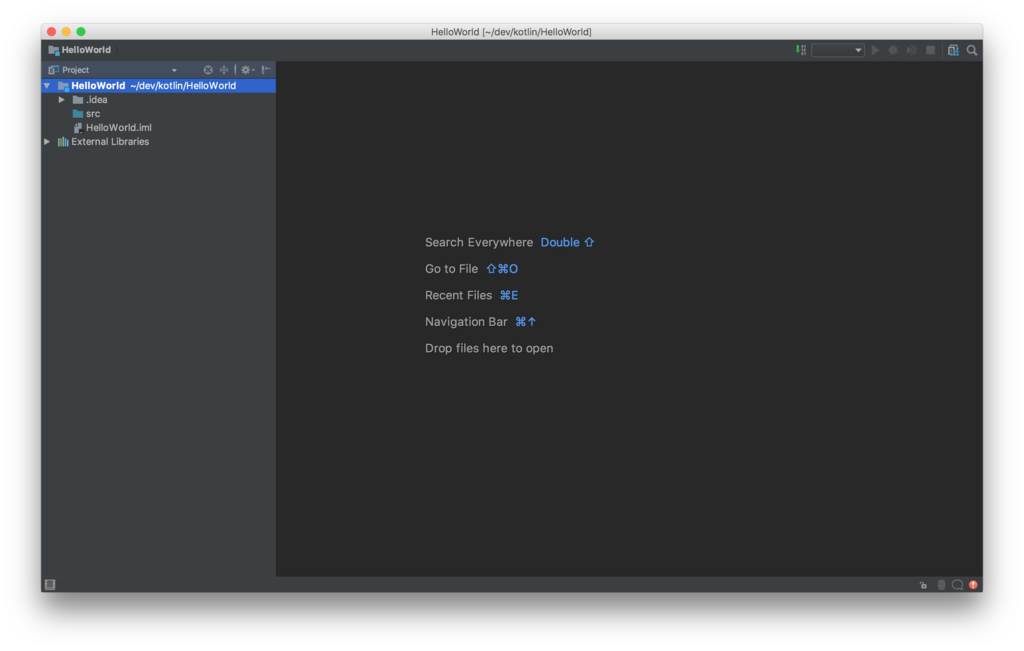
エントリポイントを作成
fun main(args: Array<String>) {
    console.log("Hello, World")
}
⌘9でビルド
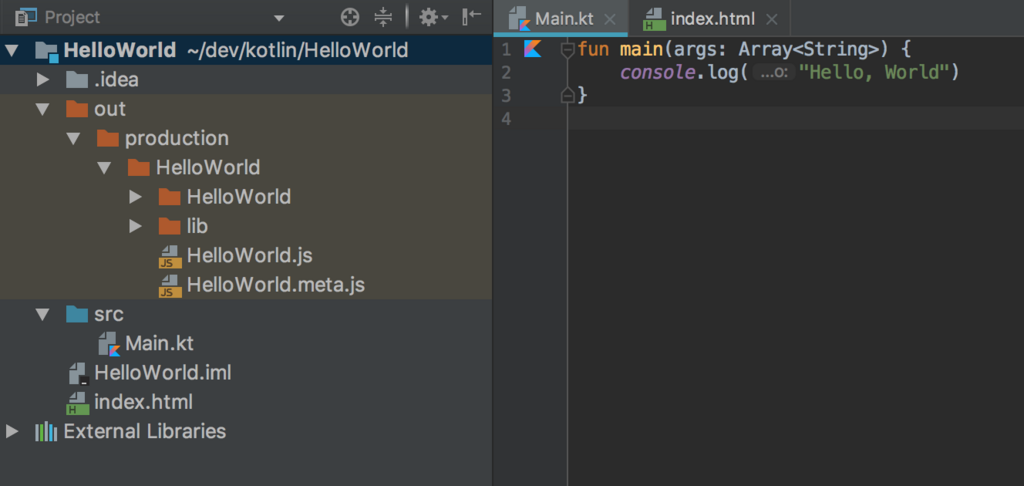
outディレクトリにコンパイル結果が入ってます。エラーは無かったようです。
HelloWorld.js
HelloWorld.js見てみましょう
if (typeof kotlin === 'undefined') {
  throw new Error("Error loading module 'HelloWorld'. Its dependency 'kotlin' was not found. Please, check whether 'kotlin' is loaded prior to 'HelloWorld'.");
}
var HelloWorld = function (_, Kotlin) {
  'use strict';
  function main(args) {
    console.log('Hello, World');
  }
  _.main_kand9s$ = main;
  main([]);
  Kotlin.defineModule('HelloWorld', _);
  return _;
}(typeof HelloWorld === 'undefined' ? {} : HelloWorld, kotlin);
Kotlinというグローバルオブジェクトが無いと駄目のようです。
kotlin.js
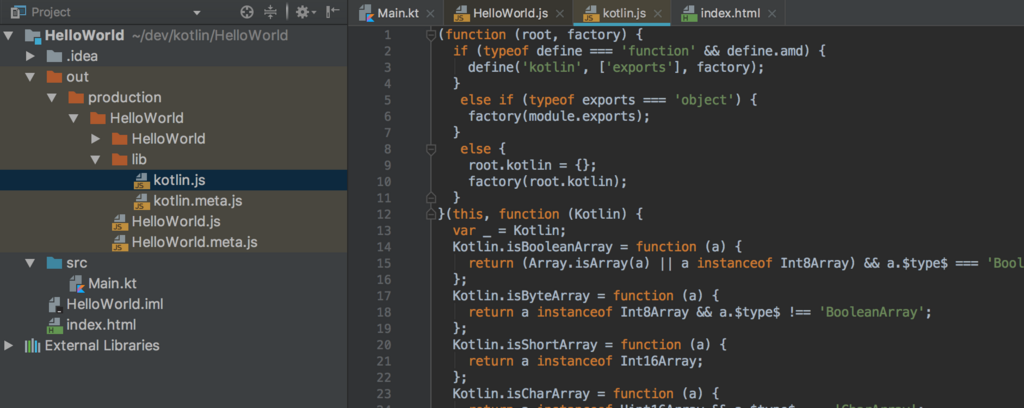
outディレクトリにlibというディレクトリもできており、そのなかにkotlin.jsというのがあります。
これをグローバルオブジェクトとして定義するとHelloWorld.jsが動きそうです。
実行
> const kotlin = require('./out/production/HelloWorld/lib/kotlin');
undefined
> require('./out/production/HelloWorld/HelloWorld');
Hello, World
{}
動きました。
他に何ができるかドキュメントを読んでみます。
JSのコードをKotlin上で書く
Calling JavaScript from Kotlin - Kotlin Programming Language
js()を使うとJSのコードが動くみたいです。ちょっと試してみましょう。
fun main(args: Array<String>) {
    val time: String = js(" new Date().toString()")
    console.log(time)
}
コンパイル結果
if (typeof kotlin === 'undefined') {
  throw new Error("Error loading module 'HelloWorld'. Its dependency 'kotlin' was not found. Please, check whether 'kotlin' is loaded prior to 'HelloWorld'.");
}
var HelloWorld = function (_, Kotlin) {
  'use strict';
  function main(args) {
    var time = (new Date()).toString(); // 新しいコード
    console.log(time);
  }
  _.main_kand9s$ = main;
  main([]);
  Kotlin.defineModule('HelloWorld', _);
  return _;
}(typeof HelloWorld === 'undefined' ? {} : HelloWorld, kotlin);
> const kotlin = require('./out/production/HelloWorld/lib/kotlin');
undefined
> require('./out/production/HelloWorld/HelloWorld');
Wed Dec 06 2017 10:27:43 GMT+0900 (JST)
{}
動きました。
nodeで動かす前提でkotlin.jsをrequireするコードも追加してみましょう。
fun main(args: Array<String>) {
    js("require('./out/production/HelloWorld/lib/kotlin')")
    val time: String = js(" new Date().toString()")
    console.log(time)
}
コンパイル結果
if (typeof kotlin === 'undefined') {
  throw new Error("Error loading module 'HelloWorld'. Its dependency 'kotlin' was not found. Please, check whether 'kotlin' is loaded prior to 'HelloWorld'.");
}
var HelloWorld = function (_, Kotlin) {
  'use strict';
  function main(args) {
    require('./out/production/HelloWorld/lib/kotlin');
    var time = (new Date()).toString();
    console.log(time);
  }
  _.main_kand9s$ = main;
  main([]);
  Kotlin.defineModule('HelloWorld', _);
  return _;a
}(typeof HelloWorld === 'undefined' ? {} : HelloWorld, kotlin);
> const kotlin = require('./out/production/HelloWorld/lib/kotlin');
undefined
> require('./out/production/HelloWorld/HelloWorld');
Wed Dec 06 2017 10:37:43 GMT+0900 (JST)
{}
動いたけど…違う。自動でrequireして欲しい…
調べてみるとKotlin Compilerの設定でCommonJSの形にもできるようです。
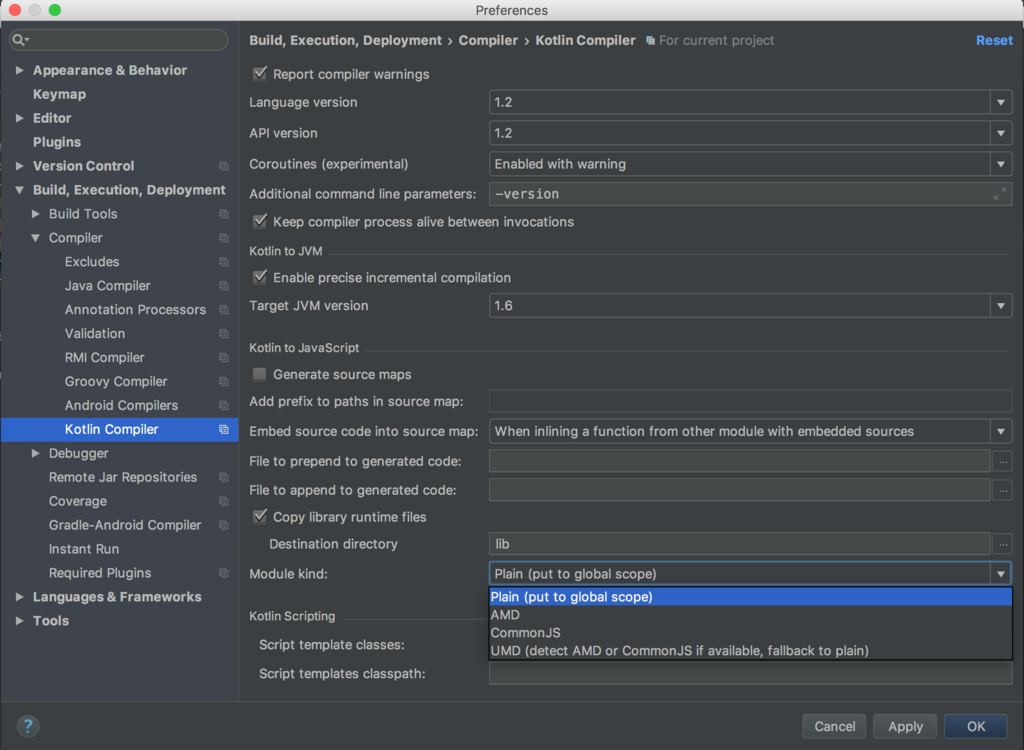
早速CommonJSにしてコンパイルしてみます。
(function (_, Kotlin) {
  'use strict';
  function main(args) {
    console.log('Hello, World');
  }
  _.main_kand9s$ = main;
  main([]);
  Kotlin.defineModule('HelloWorld', _);
  return _;
}(module.exports, require('kotlin')));
おっ、requireしてくれてる。 しかしデフォルトではlibにkotlin.jsが吐かれるのでこれだとエラーが出ます。
そこで先程のKotlin Compilerの設定でDestination directoryという設定がありましたが、これをnode_modulesに変更します。
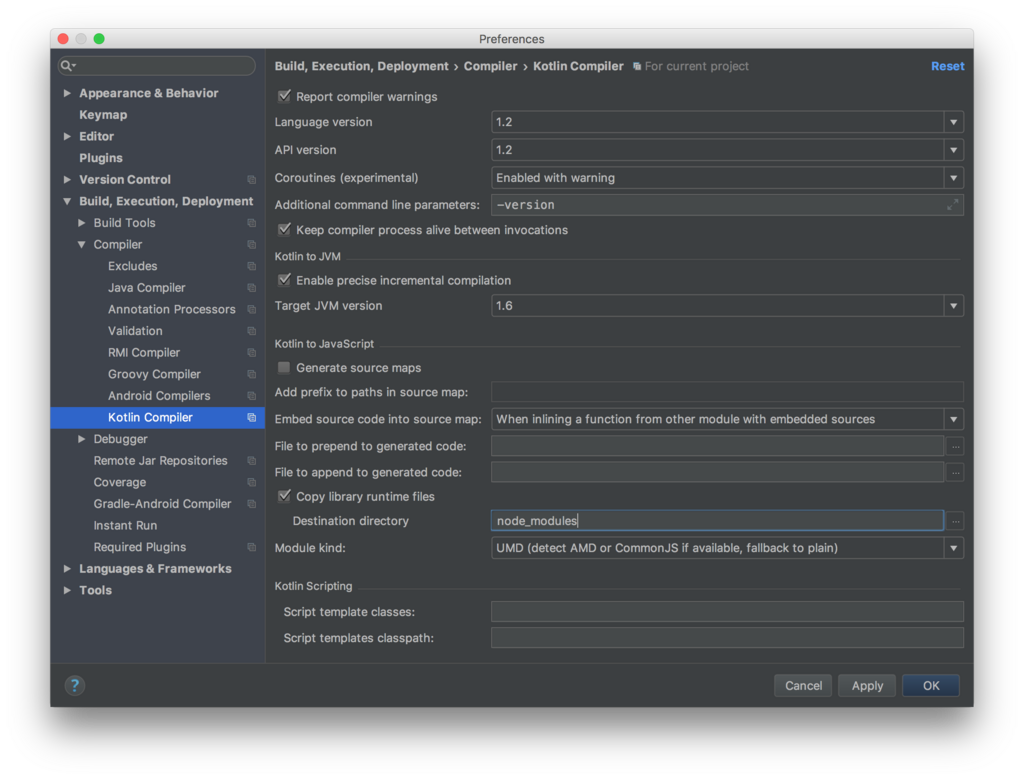
コンパイルすると
(function (root, factory) {
  if (typeof define === 'function' && define.amd)
    define(['exports', 'kotlin'], factory);
  else if (typeof exports === 'object')
    factory(module.exports, require('kotlin'));
  else {
    if (typeof kotlin === 'undefined') {
      throw new Error("Error loading module 'HelloWorld'. Its dependency 'kotlin' was not found. Please, check whether 'kotlin' is loaded prior to 'HelloWorld'.");
    }
    root.HelloWorld = factory(typeof HelloWorld === 'undefined' ? {} : HelloWorld, kotlin);
  }
}(this, function (_, Kotlin) {
  'use strict';
  function main(args) {
    console.log('Hello, World');
  }
  _.main_kand9s$ = main;
  main([]);
  Kotlin.defineModule('HelloWorld', _);
  return _;
}));
大分変わりましたね。
ちゃんとnode_modulesにコンパイル結果が入ってます。
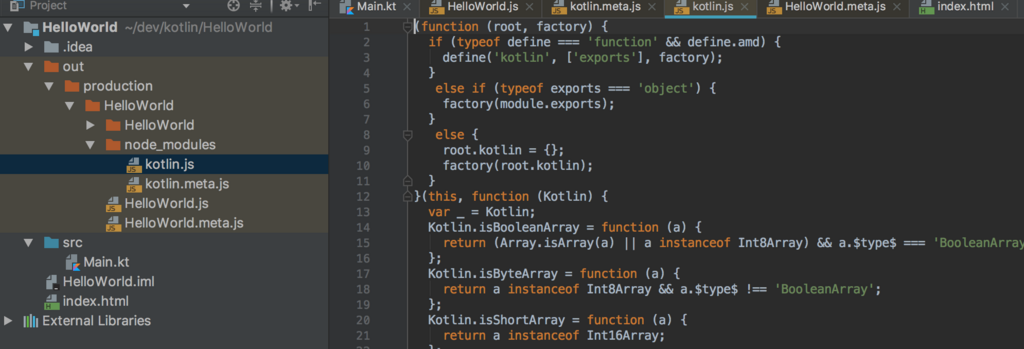
実行してみます。
% node out/production/HelloWorld/HelloWorld.js
Hello, World
やったぜ。
KotlinでNodeのサーバー立てる
JSのライブラリをKotlin側から使うのはどうするのでしょうか。
とりあえず雰囲気で書いてみる
interface Http {
    fun createServer(onRequest: (req: Any, res: Res) -> Unit): Proxy

    interface Proxy {
        fun listen(port: Int, callback: () -> Unit)
    }

    interface Res {
        fun writeHead(statusCode: Int)
        fun end(message: String)
    }
}

fun main(args: Array<String>) {
    val http: Http = js("require('http')")
    http.createServer({ _, res ->
        res.writeHead(200)
        res.end("Hello World")
    }).listen(8080, { console.log(it)})
}
コンパイルは通る。
実行してみる。
% node out/production/HelloWorld/HelloWorld.js
/Users/Ryohlan/dev/kotlin/HelloWorld/out/production/HelloWorld/HelloWorld.js:37
    http.createServer_jnnk04$(main$lambda).listen_n53o35$(8080, main$lambda_0);
         ^

TypeError: http.createServer_jnnk04$ is not a function
    at main (/Users/Ryohlan/dev/kotlin/HelloWorld/out/production/HelloWorld/HelloWorld.js:37:10)
    at /Users/Ryohlan/dev/kotlin/HelloWorld/out/production/HelloWorld/HelloWorld.js:43:3
    at Object.<anonymous> (/Users/Ryohlan/dev/kotlin/HelloWorld/out/production/HelloWorld/HelloWorld.js:46:2)
    at Module._compile (module.js:635:30)
    at Object.Module._extensions..js (module.js:646:10)
    at Module.load (module.js:554:32)
    at tryModuleLoad (module.js:497:12)
    at Function.Module._load (module.js:489:3)
    at Function.Module.runMain (module.js:676:10)
    at startup (bootstrap_node.js:187:16)
ですよねー。
そもそもcreateServer_jnnk04$ってなってしまってるのでなんとかしないと
external
これはKotlinコンパイラにそれが生のJSインターフェースだと伝える手段です。
これをHttpにつけてコンパイルしてみます。
external interface Http {
    fun createServer(onRequest: (req: Any, res: Res) -> Unit): Proxy

    interface Proxy {
        fun listen(port: Int, callback: () -> Unit)
    }

    interface Res {
        fun writeHead(statusCode: Int)
        fun end(message: String)
    }
}

fun main(args: Array<String>) {
    val http: Http = js("require('http')")
    http.createServer({ _, res ->
        res.writeHead(200)
        res.end("Hello World")
    }).listen(8080, { console.log("localhost:8080")})
}
% node out/production/HelloWorld/HelloWorld.js
localhost:8080

やったぜ。
ついでにrequireもexternalにします。
しかし問題が。
requireは読み込むモジュールごとに返り値が違うので通常だとコンパイルが通りません。
Dynamic Type
これはKotlinJSのための型定義です。
dynamic型を使うとその型はKotlinのタイプチェックから無視されるのでコンパイルが通ります。
今回だと
external fun require(path:String):dynamic

fun main(args: Array<String>) {
    val http = require("http")
    http.createServer({ _, res ->
        res.writeHead(200)
        ...
このようにして使うとcreateServerは補完には出ませんがタイプチェックを無視されるのでコンパイルは通ります。
補完を効かせるためにhttpの型をつけて最終的には以下のようになります。
external interface Http {
    fun createServer(onRequest: (req: Any, res: Res) -> Unit): Proxy

    interface Proxy {
        fun listen(port: Int, callback: (message: String) -> Unit)
    }

    interface Res {
        fun writeHead(statusCode: Int)
        fun end(message: String)
    }
}

external fun require(path:String):dynamic

fun main(args: Array<String>) {
    val http: Http = require("http")
    http.createServer({ _, res ->
        res.writeHead(200)
        res.end("Hello World")
    }).listen(8080, { console.log("localhost:8080")})
}
追記
@JsModuleでrequireいらず
ドキュメント見てたら@JsModuleを使うとrequire要らずということが分かりました。
なので更にスマートに
@JsModule("http")
external object Http { // interfaceだと実装がないのでコンパイル通らない。
    fun createServer(onRequest: (req: Any, res: Res) -> Unit): Proxy

    interface Proxy {
        fun listen(port: Int, callback: (message: String) -> Unit)
    }

    interface Res {
        fun writeHead(statusCode: Int)
        fun end(message: String)
    }
}

fun main(args: Array<String>) =
        Http.createServer{ _, res ->
            res.writeHead(200)
            res.end("Hello World")
        }.listen(8080, { console.log("localhost:8080")})
(function (_, Kotlin, $module$http) {
  'use strict';
  var Unit = Kotlin.kotlin.Unit;
  function main$lambda(f, res) {
    res.writeHead(200);
    res.end('Hello World');
    return Unit;
  }
  function main$lambda_0(it) {
    console.log('localhost:8080');
    return Unit;
  }
  function main(args) {
    $module$http.createServer(main$lambda).listen(8080, main$lambda_0);
  }
  _.main_kand9s$ = main;
  main([]);
  Kotlin.defineModule('HelloWorld', _);
  return _;
}(module.exports, require('kotlin'), require('http')));
まとめ
思ってたより全然簡単でした。
JSのライブラリをKotlin側から呼ぶにはすべてのインターフェースを定義する必要があるので依存ライブラリが増えると大変そう…
次回はReactNativeのJSコードをKotlin書いてみたいと思います。
ReactXPでHello World
エンジニアの原です。
今日はReactXPで遊んでみます。
ReactXPとは?
ReactXPとはMicrosoftが開発しているリポジトリで、ReactNativeをベースにWebとWindowsPlatform(Windows 10, 10mobile, Xbox)でのアプリ開発ができるようにしたマルチプラットフォーム対応のフレームワークです。
XP...?
XP means X-Platform Share most of your code between the web, iOS, Android, and Windows.
間違ってもあっちのXPじゃありません。
ReactNativeではJavaScriptを使って開発をしますが、ReactXPはTypeScriptです。
サンプルを動かしてみる
公式のリポジトリにsamplesというフォルダがあります。この中のhello-worldをコピーして使いましょう。
package.jsonを覗いてみる
{
  "name": "rxp-hello-world",
  "version": "1.0.0",
  "private": true,
  "main": "index.js",
  "scripts": {
    "web-watch": "webpack --progress --colors --watch",
    "rn-watch": "tsc --watch",
    "start": "node node_modules/react-native/local-cli/cli.js start",
    "android": "node node_modules/react-native/local-cli/cli.js run-android",
    "ios": "node node_modules/react-native/local-cli/cli.js run-ios"
  },
  "devDependencies": {
    "@types/node": "^7.0.12",
    "@types/webpack": "^2.2.14",
    "awesome-typescript-loader": "3.1.2",
    "source-map-loader": "^0.1.6",
    "ts-node": "^3.2.1",
    "typescript": "2.4.1",
    "webpack": "2.2.1"
  },
  "dependencies": {
    "react": "16.0.0-rc.3",
    "react-dom": "16.0.0-rc.3",
    "react-native": "^0.46.0",
    "react-native-windows": "^0.33.0",
    "reactxp": "^0.46.2",
    "reactxp-imagesvg": "^0.2.7",
    "reactxp-navigation": "^1.0.14",
    "reactxp-video": "^0.2.2"
  }
}
Hello worldサンプルなので少ないですね。
とりあえずこれから分かることは、
- WebはReact
- iOS/AndroidはReact Native
- Widnowsはreact-native-windows
- Web版のビルドは
web-watch - TSのコンパイルは
rn-watch - react-nativeのcli.jsを直接叩いてるだけ
ということが分かります(あたりまえか とりあえず動かしてみましょう。
ネイティブアプリを動かす
TSをコンパイルします
npm run rn-watch
react-nativeのお作法
npm run start // サーバーを起動
npm run ios // iOSアプリを起動
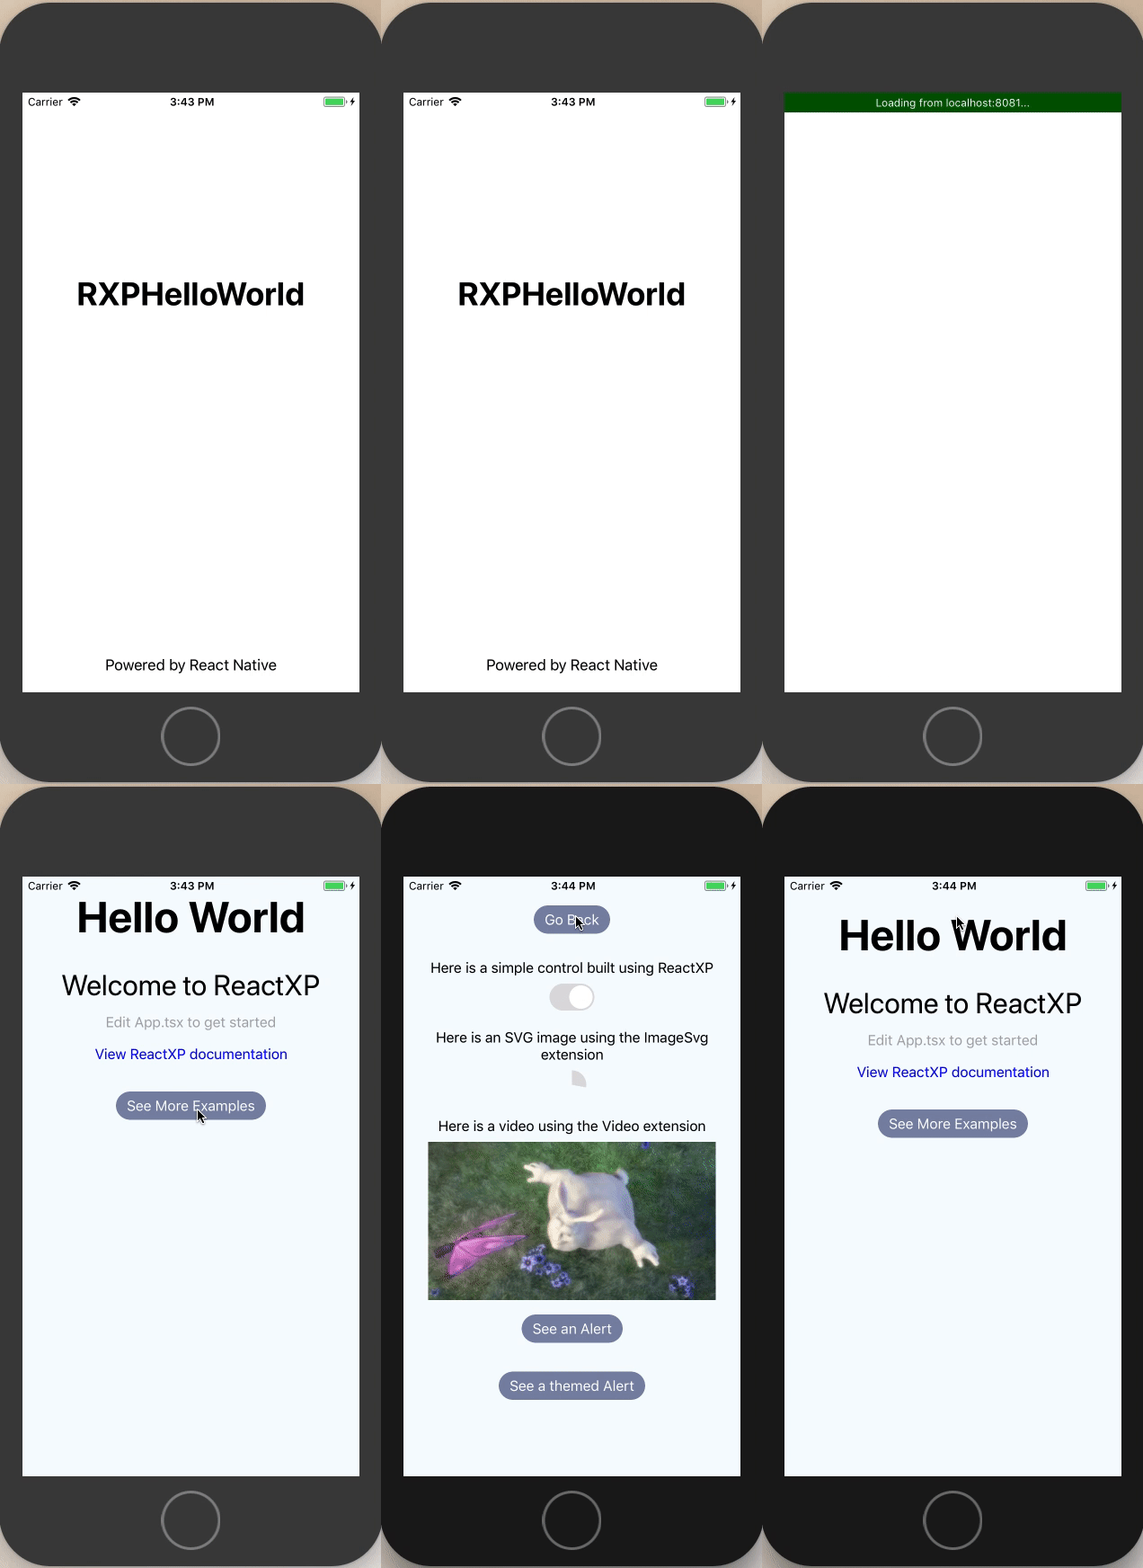
動きました。
アニメーションがぬるっとしてる。Skypeっぽい。
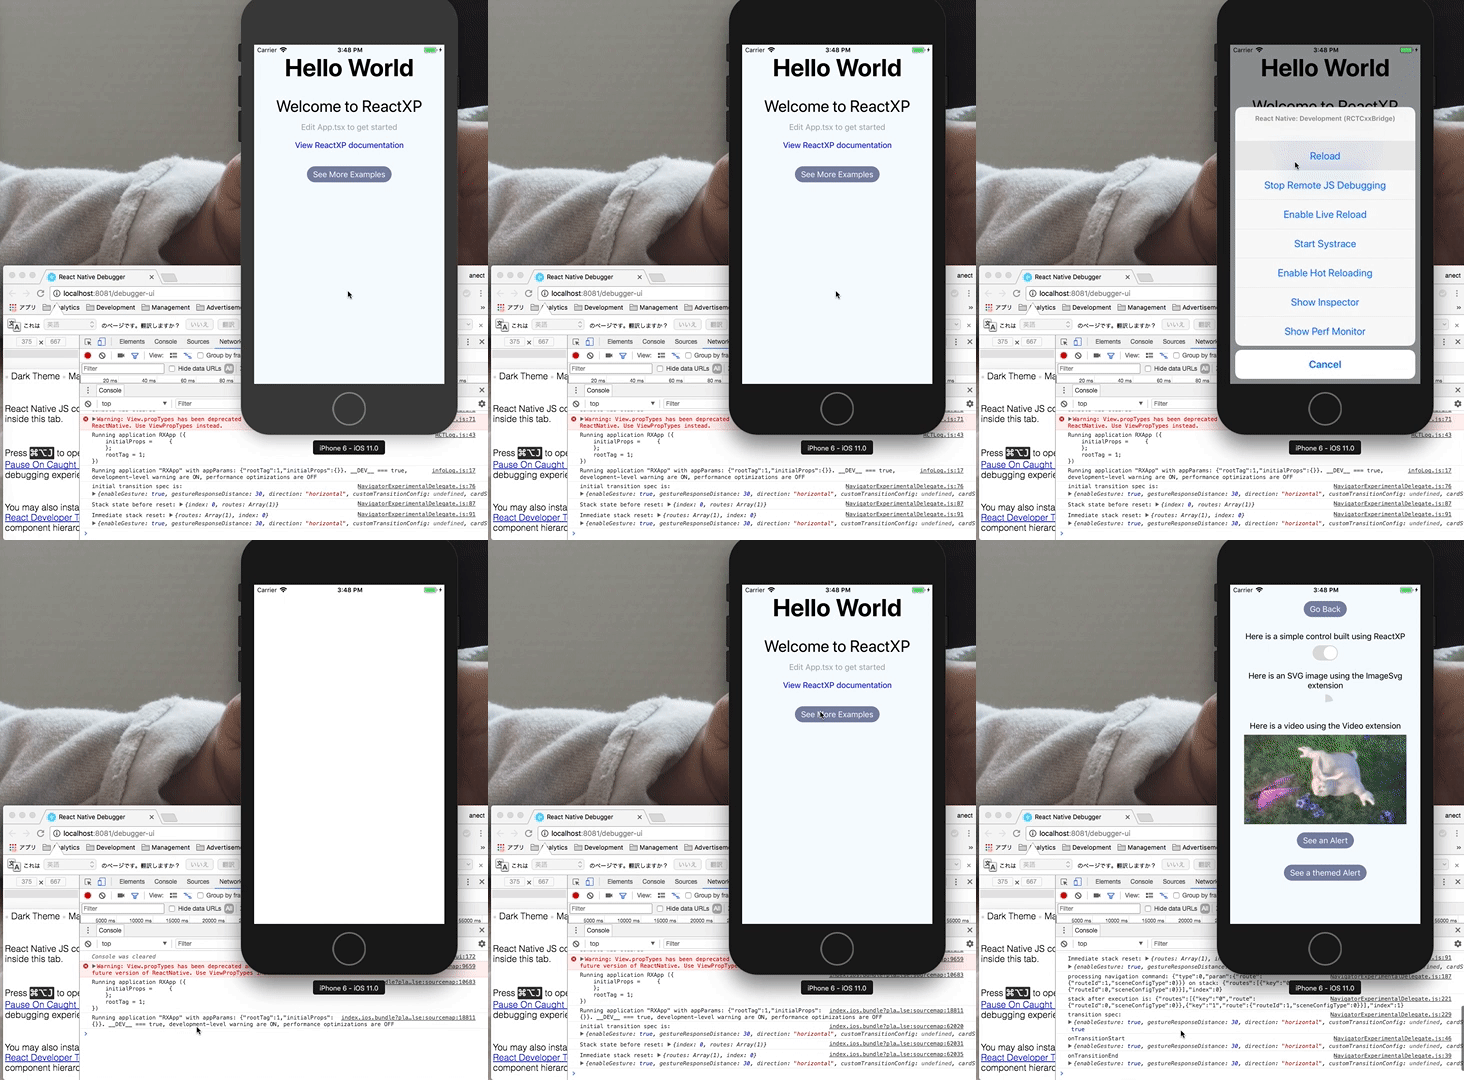
デバッグモードも問題なく使えますね。
Webを動かしてみる
TSをコンパイルします
npm run rn-watch
Web用のbundle.jsを作成
npm run web-watch
webのエントリポイントはrootのindex.htmlです。 とりあえずBrowserにファイルパスを指定してみます。
動きましたね。
画面遷移もちゃんとアニメーションしてるのは意外でした。
ただ、サンプルの画面遷移はBrowserのヒストリには残らないようです。
Windows機無いのでWindowsPlatformsの確認は出来ません。
です。
react-nativeの部分を見てみる
react-nativeはプロジェクトrootにios, androidというフォルダが作られ、その中身は純粋なiOS, Androidのプロジェクトになっています。 ReactXPもios, androidというフォルダがあるので中身がどう違うか見てみましたが、特に大きな変更点は見られませんでした。
MainActivity.java
package com.rxphelloworld;

import com.facebook.react.ReactActivity;

public class MainActivity extends ReactActivity {

    /**
     * Returns the name of the main component registered from JavaScript.
     * This is used to schedule rendering of the component.
     */
    @Override
    protected String getMainComponentName() {
        return "RXApp";
    }
}
AppDeletege.m
/**
 * Copyright (c) 2015-present, Facebook, Inc.
 * All rights reserved.
 *
 * This source code is licensed under the BSD-style license found in the
 * LICENSE file in the root directory of this source tree. An additional grant
 * of patent rights can be found in the PATENTS file in the same directory.
 */

#import "AppDelegate.h"

#import <React/RCTBundleURLProvider.h>
#import <React/RCTRootView.h>

@implementation AppDelegate

- (BOOL)application:(UIApplication *)application didFinishLaunchingWithOptions:(NSDictionary *)launchOptions
{
  NSURL *jsCodeLocation;

  jsCodeLocation = [[RCTBundleURLProvider sharedSettings] jsBundleURLForBundleRoot:@"index.ios" fallbackResource:nil];

  RCTRootView *rootView = [[RCTRootView alloc] initWithBundleURL:jsCodeLocation
                                                      moduleName:@"RXApp"
                                               initialProperties:nil
                                                   launchOptions:launchOptions];
  rootView.backgroundColor = [[UIColor alloc] initWithRed:1.0f green:1.0f blue:1.0f alpha:1];

  self.window = [[UIWindow alloc] initWithFrame:[UIScreen mainScreen].bounds];
  UIViewController *rootViewController = [UIViewController new];
  rootViewController.view = rootView;
  self.window.rootViewController = rootViewController;
  [self.window makeKeyAndVisible];
  return YES;
}

@end
Webの部分を見てみる
Webのエントリポイントはrootのindex.htmlです。
<!doctype html>
<html>
<head>
  <title></title>
  <style>
    html, body, .app-container {
      width: 100%;
      height: 100%;
      padding: 0;
      border: none;
      margin: 0;
      font-family: proxima-nova, "Helvetica Neue", Helvetica, Roboto, Arial, sans-serif
    }
    *:focus {
        outline: 0;
    }
  </style>
</head>
<body>
  <div class="app-container"></div>
  <script src="dist/bundle.js"></script>
</body>
</html>
簡素。
まとめ
ReactXPでHelloWorldしてみました。 まだガッツリ使う予定は無いのでまた暇があったら掘り下げます。
Kotlinのlet, apply, run, also
エンジニアの原です。
twitterのタイムラインに
「runとalsoの使い所分からん」
というツイートが流れてきたので。
Kotlinには便利な拡張関数があるのですが、それぞれが微妙に違うので用途を結構迷います。
そこでrun, alsoに加えよく使うであろうletとapplyの4つの特徴から用途を考えていこうと思います
定義の確認
run
public inline fun <T, R> T.run(block: T.() -> R): R = block()
- レシーバの拡張関数
- 任意の型を返す
- thisはレシーバ
let
public inline fun <T, R> T.let(block: (T) -> R): R = block(this)
- レシーバの拡張関数
- 任意の型を返す
- スコープ内外でthisが同じ
apply
public inline fun <T> T.apply(block: T.() -> Unit): T { block(); return this }
- レシーバの拡張関数
- 返り値はレシーバ
- thisはレシーバ
also
public inline fun <T> T.also(block: (T) -> Unit): T { block(this); return this }
- レシーバの拡張関数
- 返り値はthis
- スコープ内外でthisが同じ
違い
返り値がレシーバ(apply, also)
apply, alsoは返り値がレシーバに固定されます。 なのでレシーバの内部状態を変えるような処理(初期化など)が想定されます。
返り値が任意(run, let)
run, letは返り値がスコープ内の最後の処理の型になります。 つまり、レシーバを加工したい場合に使う事ができます。 加工はapply, alsoでは出来ない処理です。
スコープ内thisがレシーバ(run, apply)
レシーバ内のthisがレシーバに固定されます。 レシーバのメソッドを呼んだり、レシーバに対する処理を行うときは使いやすい。 反面、スコープ外のthisに参照したいときはthis@~~と各必要がある。
スコープ内外でthisが同じ(let, also)
tスコープ内のthisがスコープ外と同じです。thisが変わらないのでthis@~~と書く必要が無いので楽。 反面、レシーバはitなどで受け取らないといけない。 スコープ内でthisを多用するときは良いかも。
用途
上記を踏まえて私が思った使いどころ
let
ある値の加工だったり変換に使う
val age = 10
val ageStr = age.let{ "age : $it" }

//Nullable時とかよく見るよね
age?.let { " age: $it" }
letはitでレシーバにthisでスコープ外にアクセスできて任意の型を返せるので、
レシーバの加工や変換には一番適していると思います。
apply
初期化処理、メソッドの複数呼び出し
val human = Human().apply {
   name = "sabure"
   age = "30"
   context = this@HogeActivity
}
applyはthisがレシーバでレシーバを返すので内部状態の変更・初期化処理などに向いているかと思います。
あとはthis@~が複数在るような場合はalsoだと混乱しそうなのでapplyが良いかと思います。
run
エルビス演算時のnullの時の処理?
val name = n ?: run {
   ...
   ...
}
KotlinのNullチェックはエルビス演算子を使うと思うのですが、
nullの時に幾つか処理をして返り値が必要な時などに使えるのではないでしょうか。
also
applyで処理するにはthisの参照が多そうなときかな…
val human = Human().also {
   setOnClickA { this.startActivity(...) }
   setOnClickB { this.startActivity(...) }
   setOnClickC { this.startActivity(...) }
}
うーん、alsoはあんまり良い使い方思いつきませんね…
返り値がレシーバ固定なのでレシーバに関係ない事をするあまり良くないですし、
そう考えるとthisもレシーバのapplyの方がalsoに比べると使う機会が多そうな気がします。
まとめ
Kotlinの拡張関数は基本的に使ってて気持ちいいくらいなんですが、
それぞれの特徴を踏まえて用途を考えて使わないと、メンバー内などで書き方の統一が難しくなるので気をつけないといけませんね。
全部letでもいけるっちゃいけますからね。
新しい技術導入に関する勉強会で発表してきました
エンジニアの原です。
昨日、「新しい技術導入に関する勉強会」にて
「ReactNativeで始めるアプリ開発」というタイトルで発表してきました。
スライドはSlideShareに上げています。
www.slideshare.net
今回は勉強会自体が特定の分野の発表ではないので、聞き手の知識がバラバラで
どこまでを前提知識として発表内容を考えるかが非常に難しかったです。
最終的に割とふんわりした内容になってしまって、マサカリ投げどころ満載だったのでビクビクしながら発表しました(笑)
とりあえずReact Nativeがどういうものか、導入にかんして何を考えれば良いのか、など少しでも伝わっているといいなーと思います。
今後も勉強会では積極的に発表していきたいですね。
